


Il pettine liccio
Si chiama pettine liccio perché a differenza dei pettini dei telai traditional functions as both heddles for the opening of the various steps for the plot, is the classic function of the comb to pull the threads.
The size of the comb and the number of its teeth are essential both to establish the width of the fabric that the number of wires which will be made.
In general, for table looms, there are two types of combs:
One from 30/10 which is 30 teeth and a 10 cm by 40/10 ie 40 teeth in 10 cm.
With the first we get larger and soft tissue, while the second tissue more dense.
The warping
Before warping we know what kind of fabric, and then we want to achieve the type of comb to use.
If we wanted to make a scarf should use a comb 30/10 (30 teeth in 10 cm). The scarf is 20 cm wide, so we will have 60 threads in the warp.
These 20 cm of tissue should always add at least 1 cm selvedge, this is because there is always a lateral shrinkage of the fabric. At this greatly affects the type of yarn that we use and the hand of the person who weaves.
In conclusion, adding another 2 cm space used on the comb will be 22 cm and 66 warp threads that we need to put nell'orditoio table will be 33 wires on each side.
is very important to end with the last warp where you began, because this would cause us a free wire for each part of the warp during weaving in more problems.

The length of the scarf will be determined by the distance we put the warping of each other. The shrinkage of the tissue usually does not happen only in the selvage, but also in length, especially when using soft wool and elastic.
To this we must add in general, even the loss of the warp is when you realize that some types of tissue, such as when you do not use but want to make a fringed edge.
If our scarf including fringes is 1.50 cm long should add 10 to 15 cm distance between warps more. From 40 to 50 cm in more if we produce more dense tissues.
It works as follows: wire the wire outside of one of the warping peg and warping on each form a sort of 8. It is important that the other forming a warping between two parallel free Binali al centro formati dai fili.
Una volta terminato,fermare l’ultimo filo al piolo dove abbiamo posto il primo e legare i due incroci del filato con dei fili colorati. Nell’incrocio dove si hanno i 2 fili liberi utilizzeremo un filo lungo circa 80cm mentre sull’altro un filo lungo quanto basta per un nodo e un fiocco.
Montaggio dell’ordito
Una volta bloccati gli incroci dei fili su gli orditoi, levare l’ordito e stenderlo di lungo sul telaio da tavolo. La parte con il filo lungo e i due fili di ordito liberi andranno sul davanti del telaio, mentre la parte con il filo corto andrà sulla parte posteriore del telaio.
Nel subbio di ordito srotolare un poco l’asticella di metallo quel tanto che basta per poterla liberare dal cordino di nylon da un lato.
Insert into step outside of the intersection of the warp the metal rod, making sure that all wires are inserted. Attach the nylon cord back to the metal rod and where we have the tie with the colored wire to enter the intersection and tie rods in the holes. At this point remove the colored thread and extend all the wires along the metal rod, being careful not to run the wires in the vertical direction (this would cause a little shorter and a longer one). Once you have settled all the wires along the pole holding tight with your left hand, slide the rods to cross up to the top of the frame.
While with his left hand we hold tight and even tension all the wires, with the right hand we slowly turn the warp beam until you can insert and secure the corrugated cardboard between the wire and rod metal.
Now continue to wrap the warp always keeping it tight uniform, carrying winds as they cross the rods up and always trying to keep the width of the wires that wrap smoothly.

Impettinatura
Once wrapped around the warp, to undo the knot and a bow of colored thread on the front of the warp do not pull and block on both sides lies in the comb. Secure the rods crossing the frame to make sure that do not create problems during impettinatura.
With the tape marking the center of the comb and calculate half the width of the warp on the scarf that calculated by us will be 11 cm.
At this point we begin with the inclusion of warps in the comb to be inserted into a hole and a line sequentially. Profit will follow the movement of the warp in colored wire connected to the rest comb. Tie the wires inserted into small bunches to avoid the exit out of the holes in case of accidental fall of the comb.

Legatura
Terminata l’impettinatura sfilare il filo colorato e smollare le verghe di incrocio.
Portare avanti il tondino di metallo del subbio anteriore e i fili dell’ordito smollando il subbio posteriore quel tanto che basta per legarli al tondino di metallo.
Importante ricordare che la lunghezza dei fili che andranno legati al tondino, sarà la lunghezza delle frange della sciarpa.
Se volessimo realizzare un tessuto senza frange è bene utilizzare i fili per la legatura quel tanto che basta per il nodo e il fiocco.
I fili andranno legati due per parte dall’esterno verso l’interno e dovranno essere tutti con la stessa tensione per non creare difetti di tessitura.
Le verghe di incrocio dovranno essere sempre posizionate in alto nella parte posteriore del telaio.


weaving
ended ligation and checked that all the wires are taut in a uniform way we are ready for weaving.
Load the shuttling as shown


Si può iniziare a tessere sia abbassando il pettine liccio che alzandolo. Inserire la spola nel passo di ordito lasciando qualche cm di filo fuori ( filo che poi andrà bloccato cucendolo sul retro del tessuto o inserendolo con l’ago nelle trame)
Nelle passate successive accostare la trama alla cimosa senza tirare troppo e dando al filo un movimento ad arco, questo eviterà di creare delle cimose irregolari. l’impugnatura del pettine durante la tessitura deve avvenire con tutte e due le mani tenendo il pettine su ambo i lati per far si che il tessuto non sviluppi storto.
terms of tiles, pull out all the tissue from the beam front, undo the bows and knots on both sides from the outside and tie immediately so that the threads can run. Same thing in the rear beam.

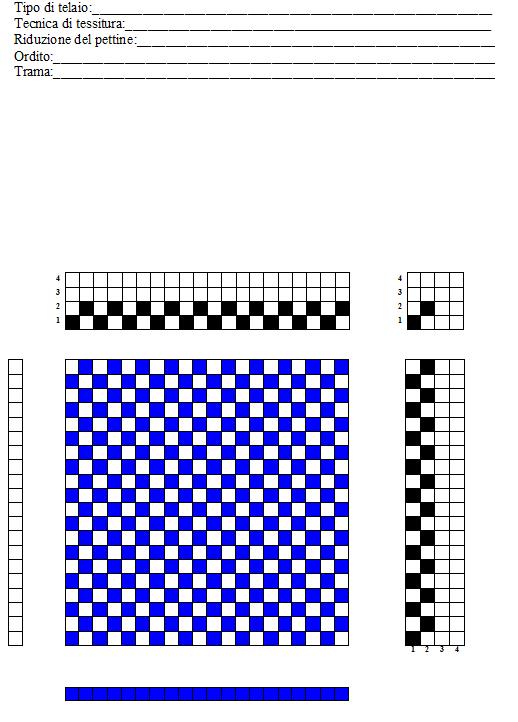
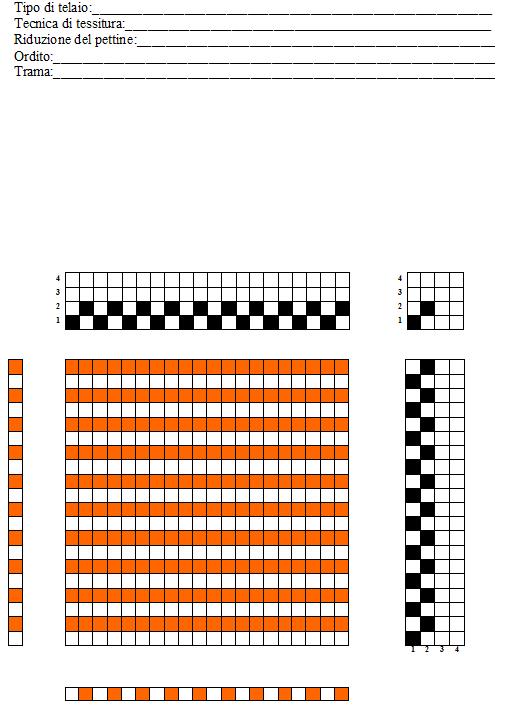
Datasheets for weaving on a loom with two heddles
or heddle frame comb.


or heddle frame comb.


0 comments:
Post a Comment